We’ve been baking batches of decorated sugar cookies for every milestone lately, and graduation season always brings the biggest smiles. You’re probably hunting for fun ways to celebrate your grad without spending hours in the kitchen or a fortune at the bakery. These treats add a personal, handmade touch to parties, and they taste way better than store-bought ones.
A good sugar cookie holds its shape during baking, stays soft enough to enjoy, and gives you a blank canvas for royal icing. One batch usually makes 24–36 cookies depending on cutter size, and they freeze beautifully for up to a month. We’ve rounded up 6 creative graduation sugar cookie ideas that range from classic caps and diplomas to more playful designs. They all use the same reliable base recipe so you can mix and match easily. You’ll find plenty of variety in colors, shapes, and details to match any school theme or personality.
Feel free to swap colors for your grad’s school hues and add names or years with food-safe markers or extra icing. If you love decorated cookies, check out our other holiday and celebration roundups for more inspiration.

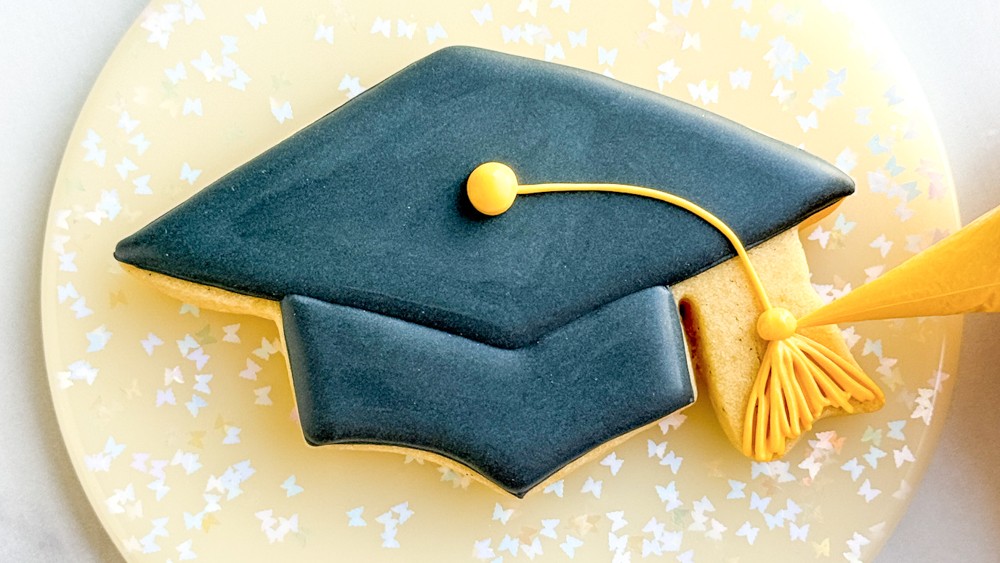
Classic Graduation Cap Sugar Cookies
These little caps look sharp on any dessert table. The smooth black or colored icing gives a nice glossy finish, while the yellow tassel adds that fun swinging detail. They’re sturdy enough for party favors and make a big visual impact with minimal fuss—perfect for busy parents or first-time decorators.
Preparation Time: 45 minutes (plus chilling) Cooking Time: 10–12 minutes Servings: Makes about 24 cookies (3-inch caps) Estimated Nutrition Info: ~120 calories per cookie
Ingredients:
| Ingredient | Amount |
|---|---|
| Unsalted butter, softened | 1 cup |
| Granulated sugar | ¾ cup |
| Large egg | 1 |
| Vanilla extract | 2 tsp |
| Almond extract (optional) | ½ tsp |
| All-purpose flour | 2¾ cups |
| Baking powder | ½ tsp |
| Salt | ¼ tsp |
For royal icing: 4 cups powdered sugar, 3 tbsp meringue powder, 5–6 tbsp water, black/gold food coloring, yellow for tassel.
Instructions:
- Cream butter and sugar until light and fluffy, about 2 minutes.
- Beat in egg and extracts.
- Whisk flour, baking powder, and salt; add to wet ingredients until dough forms.
- Divide dough, wrap in plastic, and chill for at least 1 hour.
- Preheat oven to 350°F. Roll dough to ¼-inch thick on floured surface.
- Cut with graduation cap cookie cutter (or freehand with a template).
- Bake on parchment-lined sheets for 10–12 minutes until edges just turn golden. Cool completely.
- Prepare royal icing to flooding consistency. Outline and fill the square top with black icing; let dry 30 minutes.
- Fill the brim section. Pipe a small button on top and a tassel string with yellow icing using a fine tip. Add fringe to the tassel end.
- Let dry fully (4–6 hours or overnight) before stacking.
Why You’ll Love It These caps come together quickly once the dough chills, and you can customize colors to match any school. They store well in an airtight container for up to a week at room temperature. Swap almond extract for lemon if you prefer a brighter flavor. Great for gifting or as a fun activity with older kids helping pipe the tassels.
Rolled Diploma Sugar Cookies
Nothing says “you did it” like a rolled-up diploma cookie with a pretty bow. The white icing looks clean and elegant, while the brown “paper” edge and ribbon give it realistic charm. These are beginner-friendly and great for large batches since the shape is simple to cut and decorate.
Preparation Time: 40 minutes (plus chilling) Cooking Time: 10–12 minutes Servings: Makes about 24 cookies Estimated Nutrition Info: ~115 calories per cookie
Ingredients: Use the same sugar cookie base as above. For royal icing: white, brown, and ribbon color (red, blue, or gold).
Instructions:
- Make and chill the sugar cookie dough as directed above.
- Roll to ¼-inch thick and cut into long oval or rectangle shapes for the diploma scroll.
- Bake at 350°F for 10–12 minutes. Cool on racks.
- Outline the entire diploma with white royal icing. Flood the main body and let it dry slightly.
- Add brown icing along one short end to look like the rolled paper edge.
- Pipe a ribbon bow in your chosen color across the center. Add small swirls or lines on the scroll for “writing” details.
- Dry completely before handling.
Why You’ll Love It Super simple for beginners yet impressive on a platter. You can write “Class of 2026” or the grad’s name on the scroll with a food coloring marker once the icing sets. They travel well and pair nicely with other grad treats. Try chocolate dough for a darker “leather” look if you want variety.

Graduation Gown Sugar Cookies
These gown-shaped cookies bring the full graduation outfit to the table. The draped icing lines give nice texture, and you can easily add a mortarboard topper or tassel. They feel a bit more detailed but still use straightforward piping techniques.
Preparation Time: 50 minutes (plus chilling) Cooking Time: 11 minutes Servings: Makes about 20–24 cookies Estimated Nutrition Info: ~130 calories per cookie
Ingredients: Same sugar cookie dough. Royal icing in school colors (black, navy, or your choice) plus white for collar details.
Instructions:
- Prepare and chill dough.
- Roll out and cut using a gown-shaped cutter or template (wide at bottom, narrower at top with sleeves).
- Bake at 350°F for 10–12 minutes. Cool fully.
- Outline the gown with medium-consistency icing in the main color. Flood the body.
- Once dry (about 1 hour), pipe vertical lines down the gown for folds using a fine tip.
- Add a white collar or V-neck detail at the top. Pipe sleeves if your cutter includes them.
- Attach a small separate cap cookie or pipe a tiny mortarboard on top with black icing and a yellow tassel.
Why You’ll Love It They look impressive but break down into easy steps. Customize with school colors or add a name on the gown. The dough holds details well without spreading. Perfect for a dessert table centerpiece, and leftovers freeze nicely for future celebrations.

Class of 2026 Plaque or Message Cookies
Big, bold message cookies let you personalize with the year, name, or “Congrats Grad!” These plaque or round shapes are easy to cut and give lots of room for writing. They make wonderful photo props or take-home favors.
Preparation Time: 40 minutes (plus chilling) Cooking Time: 10–12 minutes Servings: Makes about 18–24 cookies Estimated Nutrition Info: ~125 calories per cookie
Ingredients: Standard sugar cookie dough. Royal icing in white, black, gold, or school colors.
Instructions:
- Chill dough after mixing.
- Roll and cut into plaques, stars, circles, or rectangles using cutters or templates.
- Bake until lightly golden at edges. Cool.
- Flood the base with white or colored icing. Let dry 1–2 hours.
- Pipe the year “2026” or message in contrasting color with a fine writing tip. Add small mortarboard or confetti dots for extra flair.
- Use gold luster dust or sprinkles for shine if desired. Dry overnight.
Why You’ll Love It Highly customizable—swap the year or add the grad’s name or school. These work great for any age graduation. The flat surface makes lettering easy even for new decorators. They store well and look festive mixed in with other shapes.

Smiling Graduate Face Cookies with Cap
These cute round cookies feature a simple face peeking out from under a grad cap. They add personality and work especially well for younger grads or as a playful touch. Modeling chocolate or icing creates the face quickly.
Preparation Time: 55 minutes (plus chilling) Cooking Time: 10 minutes Servings: Makes about 24 cookies Estimated Nutrition Info: ~135 calories per cookie
Ingredients: Sugar cookie dough. Peach-colored modeling chocolate or icing for face, black for cap, yellow for tassel.
Instructions:
- Make and chill dough.
- Cut 3-inch circles for heads.
- Bake and cool.
- Cover the top half or third with black icing or fondant for the cap. Add a small round button and yellow tassel.
- For the face: Roll peach modeling chocolate thin or pipe skin-tone icing. Add simple smiley eyes and mouth with a black food-safe marker or tiny icing dots.
- Let everything set fully.
Why You’ll Love It Kids and adults both love the cheerful faces. It’s a fun break from traditional shapes while still feeling graduation-themed. Use school-color caps and tassels. The cookies stay soft inside and make great individual gifts. Easy to scale up for big parties.

Creative Star or Balloon “You Did It!” Cookies
These fun star or balloon shapes celebrate with bright colors and upbeat messages. They bring energy to the table and work well alongside more traditional designs for variety.
Preparation Time: 45 minutes (plus chilling) Cooking Time: 10–12 minutes Servings: Makes about 24 cookies Estimated Nutrition Info: ~120 calories per cookie
Ingredients: Same base dough. Icing in bright school colors, white for messages.
Instructions:
- Chill dough.
- Cut stars, balloons, or burst shapes.
- Bake and cool completely.
- Flood base color. Dry slightly.
- Pipe “You Did It!” or “Congrats” in the center. Add small cap silhouettes or confetti dots.
- Finish with tassel or string details on balloon versions.
Why You’ll Love It These add whimsy and color pop. They’re quick to decorate once you get the flooding down. Great for mixing into assortments or using as cupcake toppers (make them smaller). Flexible for any theme—just change colors and wording.
Tips for Successful Graduation Cookie Decorating
Choosing and Preparing Your Royal Icing
Royal icing is perfect for clean lines and detailed work. Mix powdered sugar, meringue powder, and water to get flooding consistency (it should flow smoothly but not run off the cookie). Make small batches in different colors so nothing dries out. Add a tiny bit of corn syrup for extra shine if you like.
Storage and Make-Ahead Tips
Bake cookies up to 2 weeks ahead and freeze undecorated in airtight containers with parchment between layers. Decorated cookies last 5–7 days at room temperature in a cool, dry spot. For longer, freeze them flat on trays then bag them. Thaw at room temperature before serving.
Common Beginner Mistakes to Avoid
Don’t skip chilling the dough—it prevents spreading. Test icing consistency on a plate first. Work in small batches so icing doesn’t crust over. Let base layers dry fully (at least 30–60 minutes) before adding details to avoid bleeding.
Scaling for Big Parties and Dietary Swaps
Double the dough recipe for 50+ cookies and bake in shifts. For gluten-free, use a 1:1 gluten-free flour blend that includes xanthan gum. Dairy-free? Swap butter for a good plant-based stick. Always check food coloring labels for dietary needs.
FAQ
Can I make these cookies ahead of time for a graduation party? Yes! Bake the plain cookies up to a month in advance and freeze them. Decorate 3–5 days before the event so the icing sets nicely. Store in a single layer in airtight containers.
What if I don’t have graduation-specific cutters? No problem. Use round, square, or rectangle cutters for faces, plaques, and diplomas. Print simple templates from online, cut them out of cardstock, and trace around them on the dough with a knife.
How do I get really smooth royal icing without bubbles? Stir gently after mixing to avoid incorporating air. Tap the iced cookie lightly on the counter or use a toothpick to pop any bubbles right after flooding. Dry in a low-humidity room.
Can kids help decorate these? Absolutely. Older kids (8+) can flood and add simple details. Younger ones love sprinkling or adding the tassels with help. Prepare extra plain cookies so everyone can create their own.
What’s the best way to transport decorated cookies? Layer them in a shallow box with tissue paper or parchment between layers. Keep them flat and cool. For longer trips, consider wrapping individually in cellophane bags.
How do I fix cracked or dry royal icing? Add a few drops of water and stir well. If it’s too thick, it cracks when dry; too thin, it runs. Practice on a test cookie. A damp brush can sometimes smooth small issues.
Are there easy swaps if I run out of an ingredient? No meringue powder? Use a simple powdered sugar + milk glaze, though it won’t dry as hard. Out of almond extract? Vanilla works fine alone. For vegan, use egg replacer in the dough and aquafaba-based royal icing.
How long do the decorated cookies stay fresh? They taste best within 5–7 days at room temp. The icing acts as a seal, so they don’t dry out quickly. Freeze for longer storage—thaw uncovered to avoid condensation on the icing.
Graduation flies by so fast—why not mark it with something sweet you made yourself? Pick one or two of these ideas to start with, and you’ll have a beautiful assortment that everyone will remember. Save this list for next year or share it with a friend who’s throwing a party. We’d love to hear which design becomes your favorite. Happy baking and huge congrats to all the graduates!