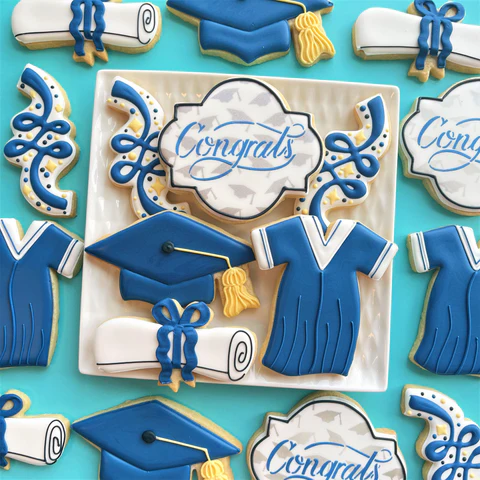
The graduation season brings such a wonderful sense of accomplishment and celebration, doesn’t it? As families gather to honor their graduates, the desire for personalized, memorable touches often sparks creative ideas. Delicious, beautifully decorated treats become a focal point, reflecting the immense joy and hard work invested over the years. We understand you’re searching for inspiring ways to make those moments extra special.
This collection of stunning graduation cookies decorated offers seven unique, tried-and-true designs that are sure to impress every guest. From classic caps and diplomas to modern ombré numbers and elegant gold leaf accents, each recipe provides practical tips for achieving bakery-quality results right in your own kitchen. You’ll find options for every skill level, ensuring your celebratory spread is truly unforgettable.
Dive into these detailed recipes, explore the diverse decoration techniques, and discover how simple ingredients can transform into edible masterpieces. We’ve poured years of baking experience into these ideas, making sure they are both achievable and show-stopping. Prepare to craft the perfect sweet tributes for your graduate’s momentous day.
7 Stunning Graduation Cookies Decorated
Classic Royal Icing Cap & Scroll Cookies

These timeless cap and scroll cookies are an absolute must for any graduation celebration, embodying tradition with every bite. Their crisp vanilla sugar cookie base provides the perfect canvas for smooth, vibrant royal icing decorations. Each cookie is a miniature work of art, delivering a satisfying crunch followed by a sweet, buttery flavor that guests will adore and remember.
Preparation Time: 1 hour 30 minutes
Cooking Time: 12 minutes
Servings: 24 cookies
Estimated Nutrition Info: 180 calories, 8g fat, 25g carbs, 2g protein per cookie
Ingredients
| Ingredient | Quantity |
|---|---|
| All-purpose flour | 3 cups |
| Unsalted butter, softened | 1 cup |
| Granulated sugar | 1 cup |
| Large egg | 1 |
| Vanilla extract | 1 tsp |
| Baking powder | 1 tsp |
| Salt | 1/2 tsp |
| Powdered sugar | 4 cups |
| Meringue powder | 3 tbsp |
| Warm water | 1/2 cup |
| Food coloring (black, white) | as needed |
Step by Step Instructions How to make
Step 1: Cream Butter and Sugar
Begin by creaming the softened unsalted butter and granulated sugar together in a large mixing bowl until the mixture becomes light and fluffy. This step is crucial for incorporating air, which helps create a tender, soft cookie texture. Ensure they are fully combined for optimal results.
Step 2: Add Wet Ingredients
Next, beat in the large egg and pure vanilla extract until they are well incorporated into the butter and sugar mixture. Scrape down the sides of the bowl to ensure everything is evenly combined, setting the stage for perfectly flavored graduation cookies decorated. The aroma will already begin to fill your kitchen.
Step 3: Combine Dry Ingredients
In a separate bowl, whisk together the all-purpose flour, baking powder, and salt. Gradually add this dry mixture to the wet ingredients, mixing on low speed until just combined. Overmixing can lead to tough cookies, so stop as soon as a dough forms.
Step 4: Chill the Dough
Divide the cookie dough into two equal portions, flatten each into a disk, and wrap them tightly in plastic wrap. Refrigerate the dough for at least one hour. Chilling helps prevent the cookies from spreading too much during baking, ensuring sharp shapes for your graduation cookies decorated.
Step 5: Roll and Cut Cookies
On a lightly floured surface, roll out one disk of chilled dough to about 1/4-inch thickness. Use graduation-themed cookie cutters, such as cap and scroll shapes, to cut out your cookies. Carefully transfer them to baking sheets lined with parchment paper.
Step 6: Bake the Cookies
Bake the cookies in a preheated oven at 375°F (190°C) for 8 to 12 minutes, or until the edges are lightly golden. Allow them to cool on the baking sheets for a few minutes before transferring them to a wire rack to cool completely. Ensure they are fully cooled before decorating.
Step 7: Prepare Royal Icing
To make the royal icing, combine powdered sugar and meringue powder in a large bowl. Gradually add warm water, mixing on low speed until a thick, smooth consistency is achieved. Increase speed to medium-high and beat for 5-7 minutes until stiff, glossy peaks form.
Step 8: Color and Decorate
Divide the royal icing into separate bowls and color with food gel as desired, typically black for caps and white for scrolls. Use piping bags with fine tips to outline the cookies, then flood with a slightly thinned icing consistency. Allow each layer to dry completely before adding fine details, bringing your graduation cookies decorated to life.
Why You’ll Love It
These classic graduation cookies decorated are perfect for their traditional charm and delicious vanilla flavor. They offer incredible versatility for color schemes, allowing you to match any school or university hues. You can easily swap vanilla extract for almond or lemon for a different taste profile, making them truly customizable for your special event.
Ombre “Class Of” Number Cookies

Celebrate your graduate’s year with these trendy Ombre “Class Of” number cookies, a modern twist on classic sweets. Each large number cookie transitions beautifully through shades of a chosen color, creating a visually stunning effect. The slight chewiness of the cookie complements the smooth, subtly sweet royal icing, making them both a delight to look at and to eat.
Preparation Time: 1 hour 45 minutes
Cooking Time: 15 minutes
Servings: 12 large number cookies
Estimated Nutrition Info: 220 calories, 10g fat, 30g carbs, 3g protein per cookie
Ingredients
| Ingredient | Quantity |
|---|---|
| All-purpose flour | 3.5 cups |
| Unsalted butter, softened | 1 cup |
| Granulated sugar | 1.25 cups |
| Large egg | 1 |
| Vanilla extract | 1.5 tsp |
| Baking powder | 1 tsp |
| Salt | 1/2 tsp |
| Powdered sugar | 5 cups |
| Meringue powder | 4 tbsp |
| Warm water | 3/4 cup |
| Food coloring (various shades) | as needed |
Step by Step Instructions How to make
Step 1: Cream Butter and Sugar Base
In a large bowl, cream together the softened unsalted butter and granulated sugar until the mixture is light, fluffy, and pale yellow. This aeration is key to achieving a tender crumb for your significant graduation cookies decorated. Scrape the bowl often to ensure thorough mixing.
Step 2: Incorporate Egg and Vanilla
Add the large egg and vanilla extract to the creamed mixture, beating until fully combined and smooth. The vanilla contributes a warm, inviting aroma that will enhance the overall flavor. Ensure no streaks of egg remain visible in the batter.
Step 3: Add Dry Ingredients Gradually
Gradually mix in the all-purpose flour, baking powder, and salt to the wet ingredients. Mix on low speed until just combined, being careful not to overmix the dough. This gentle blending preserves the cookie’s delicate texture, forming a soft and pliable mass.
Step 4: Chill the Cookie Dough
Form the dough into a ball, flatten it into a disk, wrap it in plastic wrap, and refrigerate for at least two hours. Chilling is essential for firming the dough, preventing spreading, and allowing for clean cuts of the number shapes. This step is non-negotiable for impressive graduation cookies decorated.
Step 5: Cut Number Shapes
Roll out the chilled dough on a lightly floured surface to about 3/8-inch thickness. Use large number cookie cutters to create your “Class Of” year numbers. Carefully transfer these delicate shapes to baking sheets lined with parchment paper.
Step 6: Bake Until Golden
Bake in a preheated oven at 350°F (175°C) for 12-15 minutes, or until the edges are lightly golden and the centers are set. The cookies should be firm to the touch when gently pressed. Let them cool completely on a wire rack before attempting any decoration.
Step 7: Prepare Ombre Royal Icing
Prepare a batch of royal icing using powdered sugar, meringue powder, and warm water, beating until stiff peaks form. Divide the icing into several bowls. Gradually add increasing amounts of food coloring to each bowl to create your desired ombre shades, from light to dark.
Step 8: Decorate with Ombre Effect
Using piping bags, outline and flood each number cookie with the lightest shade of icing. Once dry, add the next darker shade, creating horizontal stripes across the cookie. Repeat with subsequent shades, allowing each layer to partially set before adding the next for a seamless ombre effect on your graduation cookies decorated.
Why You’ll Love It
These Ombre “Class Of” graduation cookies decorated are incredibly eye-catching and personalized, making a statement at any party. You can customize the ombre colors to match school colors or the graduate’s favorite hues. Feel free to add edible glitter or metallic dust for extra sparkle, elevating their festive appeal.
Personalized Monogram & Initial Cookies
Make a truly unique statement with these personalized monogram and initial cookies, a sophisticated touch for any graduation party. Each cookie showcases the graduate’s initial or a meaningful monogram, delicately piped onto a rich, buttery almond cookie base. The subtle almond flavor beautifully complements the smooth, slightly crisp royal icing, creating an elegant treat.
Preparation Time: 1 hour 15 minutes
Cooking Time: 10 minutes
Servings: 30 cookies
Estimated Nutrition Info: 170 calories, 7g fat, 24g carbs, 2g protein per cookie
Ingredients
| Ingredient | Quantity |
|---|---|
| All-purpose flour | 3 cups |
| Unsalted butter, softened | 1 cup |
| Granulated sugar | 1 cup |
| Large egg | 1 |
| Almond extract | 1 tsp |
| Baking powder | 1 tsp |
| Salt | 1/2 tsp |
| Powdered sugar | 4 cups |
| Meringue powder | 3 tbsp |
| Warm water | 1/2 cup |
| Food coloring (white, gold) | as needed |
Step by Step Instructions How to make
Step 1: Cream Butter and Sugar
Combine softened butter and granulated sugar in a stand mixer, beating on medium speed until the mixture is light, fluffy, and thoroughly creamed. This process is essential for achieving a tender cookie, ensuring that your graduation cookies decorated have an exquisite base. The texture should be visibly airy.
Step 2: Add Egg and Almond Extract
Beat in the large egg and almond extract until fully incorporated into the butter-sugar mixture. The almond extract will infuse the dough with a distinctive, aromatic flavor. Ensure all ingredients are completely blended before moving to the next step.
Step 3: Integrate Dry Ingredients
In a separate bowl, whisk together the flour, baking powder, and salt. Gradually add this dry mixture to the wet ingredients, mixing on low speed until a cohesive dough forms. Avoid overmixing to keep the cookies tender and prevent gluten development.
Step 4: Chill Dough Firmly
Divide the dough, wrap it in plastic, and chill for at least one hour. This chilling period is crucial for preventing spread and ensuring crisp, well-defined edges for your initial shapes. A firm dough is much easier to work with, making the cutting process smooth.
Step 5: Roll and Cut Initials
On a lightly floured surface, roll the chilled dough to an even 1/4-inch thickness. Use letter cookie cutters to cut out the desired monograms or initials. Carefully transfer the cutouts to parchment-lined baking sheets, spacing them evenly apart.
Step 6: Bake to Perfection
Bake the cookies in a preheated 375°F (190°C) oven for 8-10 minutes, or until the edges are just barely golden. The cookies should still be soft in the center when removed from the oven. Allow them to cool completely on a wire rack before decorating.
Step 7: Prepare Royal Icing
Prepare royal icing by beating powdered sugar, meringue powder, and warm water until stiff peaks form. This sturdy icing is perfect for detailed piping. Divide the icing and color a small portion with gold edible dust mixed with a few drops of water or clear extract for metallic details.
Step 8: Decorate with Monograms
Outline and flood the cooled cookies with white or a light-colored royal icing. Once this base layer is completely dry, use the gold icing and a fine piping tip to carefully pipe the graduate’s initial or monogram onto each cookie. These sophisticated graduation cookies decorated will truly stand out.
Why You’ll Love It
These personalized graduation cookies decorated add an incredibly thoughtful and sophisticated touch to any celebration. The almond flavor is a delightful departure from traditional vanilla, offering a gourmet experience. You can easily swap almond extract for pistachio or orange for unique flavor variations, tailoring them perfectly.
Glittery Diploma Roll-Up Cookies

These charming glittery diploma roll-up cookies are an absolute delight, perfect for celebrating academic achievements. Each cookie is shaped like a miniature scroll, with a delicate roll that hints at the sweetness within. A dusting of edible glitter adds a celebratory sparkle, making these buttery, melt-in-your-mouth treats truly memorable and eye-catching.
Preparation Time: 1 hour
Cooking Time: 10 minutes
Servings: 28 cookies
Estimated Nutrition Info: 160 calories, 7g fat, 23g carbs, 2g protein per cookie
Ingredients
| Ingredient | Quantity |
|---|---|
| All-purpose flour | 3 cups |
| Unsalted butter, softened | 1 cup |
| Granulated sugar | 1 cup |
| Large egg | 1 |
| Vanilla extract | 1 tsp |
| Baking powder | 1 tsp |
| Salt | 1/2 tsp |
| Powdered sugar | 3 cups |
| Meringue powder | 2 tbsp |
| Warm water | 1/2 cup |
| Edible glitter (gold/silver) | as needed |
Step by Step Instructions How to make
Step 1: Cream Butter and Sugar
Combine the softened unsalted butter and granulated sugar in a large mixing bowl. Beat on medium speed until the mixture is light, fluffy, and visibly pale. This initial step creates the tender base for your festive graduation cookies decorated, ensuring a delicate texture.
Step 2: Add Wet Ingredients
Next, incorporate the large egg and vanilla extract into the creamed mixture. Continue beating until all ingredients are thoroughly combined and smooth. The vanilla provides a comforting, familiar aroma that promises deliciousness.
Step 3: Mix Dry Ingredients
In a separate bowl, whisk together the all-purpose flour, baking powder, and salt. Gradually add this dry mixture to the wet ingredients, mixing on low speed until a soft dough forms. Avoid overmixing to maintain the cookies’ tender structure.
Step 4: Chill Dough Firmly
Divide the cookie dough into two portions, flatten them into disks, and wrap tightly in plastic wrap. Refrigerate for at least one hour. Chilling is crucial for easy handling and preventing the diploma shapes from spreading during baking, maintaining precise forms for your graduation cookies decorated.
Step 5: Roll and Shape Diplomas
On a lightly floured surface, roll out one disk of dough to about 1/8-inch thickness. Use a rectangular cookie cutter (or a knife for straight edges) to cut out rectangles measuring approximately 2×3 inches. Gently roll one short end of each rectangle inwards about 1/2 inch to create the “diploma” scroll.
Step 6: Bake and Cool
Carefully transfer the shaped diploma cookies to baking sheets lined with parchment paper. Bake in a preheated 375°F (190°C) oven for 8-10 minutes, or until the edges are lightly golden. Let them cool on the baking sheet for a few minutes before moving to a wire rack to cool completely.
Step 7: Prepare Thin Icing
Prepare a thin royal icing by combining powdered sugar, meringue powder, and warm water, beating until smooth and pourable. You want a consistency that will coat a spoon and drip off slowly. This will be used for a light sheen on the diplomas.
Step 8: Glaze and Glitter
Once the diploma cookies are completely cool, gently dip or brush them with the thin royal icing. While the icing is still wet, sprinkle generously with edible glitter (gold or silver works wonderfully). Allow the icing to set completely for dazzling graduation cookies decorated, embodying true celebration.
Why You’ll Love It
These glittery diploma roll-up graduation cookies decorated are wonderfully thematic and visually captivating, perfect for celebrating. The delicate roll shape is incredibly charming, offering a unique presentation. You can easily adjust the glitter color or add a tiny edible ribbon for an extra personalized touch.
School Colors Marble Swirl Cookies
These vibrant School Colors Marble Swirl Cookies are a fantastic way to showcase institutional pride with a beautiful, artistic flair. Each cookie features a mesmerizing swirl of two or three school colors, created with royal icing. The buttery sugar cookie base provides a delightful crunch, making these a truly celebratory and delicious centerpiece for any graduation event.
Preparation Time: 1 hour 30 minutes
Cooking Time: 12 minutes
Servings: 24 cookies
Estimated Nutrition Info: 180 calories, 8g fat, 25g carbs, 2g protein per cookie
Ingredients
| Ingredient | Quantity |
|---|---|
| All-purpose flour | 3 cups |
| Unsalted butter, softened | 1 cup |
| Granulated sugar | 1 cup |
| Large egg | 1 |
| Vanilla extract | 1 tsp |
| Baking powder | 1 tsp |
| Salt | 1/2 tsp |
| Powdered sugar | 4 cups |
| Meringue powder | 3 tbsp |
| Warm water | 1/2 cup |
| Food coloring (school colors) | as needed |
Step by Step Instructions How to make
Step 1: Prepare Cookie Dough Base
In a large bowl, cream together the softened unsalted butter and granulated sugar until light and fluffy. This step is foundational for creating tender, flavorful cookies that hold their shape. Ensure the mixture is well aerated, providing a great base for your graduation cookies decorated.
Step 2: Incorporate Egg and Vanilla
Beat in the large egg and vanilla extract until completely combined. Scrape down the sides of the bowl to ensure uniform mixing of ingredients. The vanilla provides a comforting warmth to the cookie base, making them irresistible.
Step 3: Combine Dry Ingredients
Gradually add the whisked dry ingredients (flour, baking powder, salt) to the wet mixture, mixing on low speed until just incorporated. Be careful not to overmix, as this can lead to tough cookies. The dough should come together smoothly.
Step 4: Chill Dough Thoroughly
Divide the dough into two disks, wrap them in plastic wrap, and refrigerate for at least one hour. Chilling is crucial for firming the dough, which prevents spreading during baking and allows for clean, precise cuts of any desired shape.
Step 5: Roll and Cut Shapes
On a lightly floured surface, roll out the chilled dough to about 1/4-inch thickness. Use round or square cookie cutters, or even graduation cap shapes, to cut out cookies. Carefully transfer these cutouts to parchment-lined baking sheets, leaving space between each.
Step 6: Bake Cookies Until Set
Bake in a preheated 375°F (190°C) oven for 8-12 minutes, or until the edges are lightly golden. Cookies should appear set in the center. Allow them to cool on the baking sheet for a few minutes before transferring to a wire rack to cool completely.
Step 7: Prepare Colored Royal Icing
Prepare royal icing as directed, using powdered sugar, meringue powder, and warm water, beating to stiff peaks. Divide the icing and color separate portions with your chosen school colors. Prepare piping bags with small round tips for each color.
Step 8: Marble Swirl Decoration
Outline and flood each cooled cookie with a base color (often white). While the base is still wet, pipe lines or dots of your school colors onto the wet icing. Use a toothpick or scribe tool to gently swirl the colors together, creating a beautiful marble effect for your graduation cookies decorated.
Why You’ll Love It
These marble swirl graduation cookies decorated are incredibly festive and visually striking, perfect for school spirit. The marbling technique allows for endless creative possibilities with color combinations. You can easily experiment with different color placements for varied swirling patterns on each cookie.
Elegant Edible Gold Leaf Cookies
Elevate your graduation celebration with these truly elegant edible gold leaf cookies, embodying sophistication and success. Each cookie features a delicate shimmer of real edible gold leaf, creating a luxurious and celebratory feel. The crisp, buttery shortbread base provides a rich flavor, making these cookies as exquisite to taste as they are to behold.
Preparation Time: 1 hour 15 minutes
Cooking Time: 15 minutes
Servings: 20 cookies
Estimated Nutrition Info: 190 calories, 10g fat, 22g carbs, 2g protein per cookie
Ingredients
| Ingredient | Quantity |
|---|---|
| All-purpose flour | 2.5 cups |
| Unsalted butter, softened | 1 cup |
| Powdered sugar | 1 cup |
| Vanilla extract | 1 tsp |
| Salt | 1/4 tsp |
| Egg white | 1 |
| Edible gold leaf sheets | as needed |
| Food coloring (white/cream) | as needed |
Step by Step Instructions How to make
Step 1: Cream Butter and Sugar
In a large bowl, cream together the softened unsalted butter and powdered sugar until the mixture is light, fluffy, and completely smooth. This step is essential for creating a tender and rich shortbread base for your luxurious graduation cookies decorated. Ensure no lumps remain.
Step 2: Add Vanilla and Salt
Beat in the vanilla extract and salt until just combined. The vanilla enhances the buttery flavor, while salt balances the sweetness. Avoid overmixing once these are added, maintaining the delicate structure of the dough.
Step 3: Incorporate Flour Gradually
Gradually add the all-purpose flour to the wet ingredients, mixing on low speed until a soft dough forms. It’s important to mix until just combined, as overworking shortbread dough can result in a tough texture. The dough should be cohesive and pliable.
Step 4: Chill the Shortbread Dough
Press the dough into a disk, wrap it in plastic wrap, and refrigerate for at least one hour. Chilling is vital for preventing the cookies from spreading too much during baking, ensuring clean edges and a crisp texture for these special graduation cookies decorated.
Step 5: Roll and Cut Shapes
On a lightly floured surface, roll out the chilled dough to about 1/4-inch thickness. Use elegant cookie cutters such as squares, circles, or even small shields. Carefully transfer the cutouts to parchment-lined baking sheets, leaving a small space between each cookie.
Step 6: Bake to Pale Gold
Bake in a preheated 325°F (160°C) oven for 15-18 minutes, or until the edges are just barely golden and the centers are set. Shortbread cookies should not brown much. Let them cool completely on a wire rack before attempting any delicate decoration.
Step 7: Prepare Egg Wash or Light Glaze
Lightly whisk an egg white (or prepare a very thin glaze with powdered sugar and a few drops of milk) to use as an adhesive for the gold leaf. You want a very thin, barely visible layer to ensure the gold adheres smoothly without dissolving.
Step 8: Apply Edible Gold Leaf
Using a clean, dry brush or tweezers, carefully pick up small pieces of edible gold leaf and gently press them onto the cooled cookies. The egg white or thin glaze will act as a subtle adhesive. Arrange the gold leaf artfully for stunning graduation cookies decorated.
Why You’ll Love It
These elegant gold leaf graduation cookies decorated exude luxury and sophistication, making them perfect for a grand celebration. The simple shortbread base allows the stunning gold leaf to be the star. You can use different base cookie shapes to customize the presentation even further, adding to their unique appeal.
“Future Is Bright” Sunburst Cookies
Celebrate boundless potential with these uplifting “Future Is Bright” sunburst cookies. Each cookie beams with vibrant yellow and orange royal icing, designed with a dynamic sunburst pattern that symbolizes optimism and new beginnings. The classic vanilla sugar cookie offers a satisfying bite, making these visually striking treats a joyful addition to any graduation spread.
Preparation Time: 1 hour 30 minutes
Cooking Time: 12 minutes
Servings: 24 cookies
Estimated Nutrition Info: 180 calories, 8g fat, 25g carbs, 2g protein per cookie
Ingredients
| Ingredient | Quantity |
|---|---|
| All-purpose flour | 3 cups |
| Unsalted butter, softened | 1 cup |
| Granulated sugar | 1 cup |
| Large egg | 1 |
| Vanilla extract | 1 tsp |
| Baking powder | 1 tsp |
| Salt | 1/2 tsp |
| Powdered sugar | 4 cups |
| Meringue powder | 3 tbsp |
| Warm water | 1/2 cup |
| Food coloring (yellow, orange) | as needed |
Step by Step Instructions How to make
Step 1: Cream Butter and Sugar
In a large mixing bowl, beat the softened unsalted butter and granulated sugar until light, fluffy, and pale in color. This essential step introduces air into the mixture, contributing to the delicate crumb of your cheerful graduation cookies decorated. Ensure proper blending.
Step 2: Integrate Wet Ingredients
Add the large egg and vanilla extract to the creamed mixture, beating until fully incorporated and smooth. The vanilla provides a comforting aroma and enhances the cookie’s overall flavor profile. Scrape down the bowl’s sides to ensure everything is evenly mixed.
Step 3: Combine Dry Ingredients
In a separate bowl, whisk together the all-purpose flour, baking powder, and salt. Gradually add this dry mixture to the wet ingredients, mixing on low speed until a soft dough forms. Avoid overmixing to prevent the cookies from becoming tough.
Step 4: Chill Dough Well
Divide the dough into two portions, flatten them into disks, and wrap tightly in plastic wrap. Refrigerate for at least one hour. Chilling is crucial for easy handling and for ensuring the cookies maintain their shape during baking, resulting in perfectly formed graduation cookies decorated.
Step 5: Roll and Cut Round Shapes
On a lightly floured surface, roll out one disk of chilled dough to about 1/4-inch thickness. Use a round cookie cutter, approximately 3-inches in diameter, to cut out the cookies. Carefully transfer them to parchment-lined baking sheets, spacing them evenly.
Step 6: Bake and Cool Completely
Bake in a preheated 375°F (190°C) oven for 8-12 minutes, or until the edges are lightly golden and the centers are set. Let the cookies cool on the baking sheets for a few minutes before transferring them to a wire rack to cool completely.
Step 7: Prepare Colored Royal Icing
Prepare royal icing using powdered sugar, meringue powder, and warm water, beating until stiff peaks form. Divide the icing into two bowls. Color one portion vibrant yellow and the other a bright orange using gel food coloring.
Step 8: Create Sunburst Design
Outline and flood each cooled cookie with yellow royal icing, covering the entire surface. While the yellow icing is still wet, pipe concentric circles of orange icing onto the yellow base. Using a toothpick, drag lines from the center outwards to create a stunning sunburst effect on your graduation cookies decorated.
Why You’ll Love It
These “Future Is Bright” sunburst graduation cookies decorated are wonderfully uplifting and symbolize hope and new beginnings. The vibrant colors are incredibly eye-catching and add a cheerful element to any celebration. You can experiment with different color combinations, perhaps transitioning from light yellow to a deeper gold.
FAQ Section
What kind of cookie base is best for decorated graduation cookies?
A sturdy sugar cookie base is almost always the best choice for decorated graduation cookies. Its ability to hold shape during baking is paramount, ensuring crisp, clean edges for intricate designs. A classic vanilla flavor is versatile, but almond or lemon variations can also provide delightful undertones.
How do I prevent royal icing from bleeding or smudging on my graduation cookies decorated?
To prevent royal icing from bleeding or smudging, patience is key. Ensure each layer of icing is completely dry before applying the next, especially when using different colors or adding fine details. Using good quality gel food coloring and proper icing consistency also plays a crucial role in maintaining crisp lines and vibrant hues.
Can I make these graduation cookies decorated in advance?
Absolutely! Decorated graduation cookies can be made well in advance, making them perfect for party planning. Once fully dry, which can take 12-24 hours depending on humidity, store them in airtight containers at room temperature for up to two weeks. Avoid refrigerating, as condensation can damage the intricate icing designs.
What are some common mistakes to avoid when decorating graduation cookies?
Common mistakes include not chilling the dough long enough, resulting in misshapen cookies that spread. Overmixing the dough can lead to a tough texture. For royal icing, using the wrong consistency is frequent; icing that is too thin will bleed, while too thick can be difficult to pipe smoothly. Always ensure a completely dry surface before adding new layers.
How can I make my graduation cookies decorated look professional without advanced skills?
Focus on simple yet impactful designs. Utilizing good quality cookie cutters for clean shapes and sticking to one or two colors can create an elegant look. Simple flooding with a single color and then adding polka dots or stripes with a contrasting color while wet can create a professional-looking marbled effect with minimal skill, as shown in the marble swirl recipe.
Conclusion
Creating beautifully decorated graduation cookies is a truly rewarding experience, transforming simple ingredients into cherished tokens of celebration. We hope these seven stunning recipes have sparked your creativity and provided the confidence to craft memorable treats for your graduate’s big day. Each design offers a unique way to express pride and joy, from elegant gold leaf to playful sunbursts.
Remember, the key to success lies in patience and practice, allowing you to perfect your royal icing techniques and cookie shapes. Don’t hesitate to personalize these ideas with your graduate’s favorite colors or specific school emblems. Save this article for easy reference and let these recipes inspire your next baking adventure. Happy decorating and congratulations to all the graduates!