We’ve all been there—Easter is just around the corner, and you want something fun, festive, and fast for the cookie table or baskets. No one has hours to spend on complicated designs when the kids are bouncing off the walls and the ham is in the oven.
You’re looking for sugar cookies that taste amazing, decorate quickly, and still look like they came from a bakery. These 9 easy decorated Easter sugar cookies deliver exactly that. They use a reliable no-spread dough that rolls out smoothly and holds its shape, plus simple royal icing or glaze techniques that even beginners can master in under an hour of active decorating time.
Most recipes here make 24–36 cookies and come together with pantry staples like butter, flour, sugar, and vanilla. You’ll find a mix of classic Easter egg designs, cute bunnies, carrots, chicks, and speckled eggs—plenty of variety so you can mix and match based on your mood or time. Some use quick wet-on-wet icing for bold patterns, while others rely on sprinkles and sanding sugar for almost no-effort sparkle.
If you love holiday baking, check out our spring dessert roundups or easy no-bake treats for more ideas that fit right into busy weekends.

1. Classic Pastel Easter Egg Sugar Cookies
These buttery sugar cookies bake up soft in the center with just a hint of crisp edges. The vanilla-almond aroma fills your kitchen as they cool, and the smooth pastel royal icing feels silky under your fingers. They’re perfect for a relaxed afternoon project with kids or for gifting in cellophane bags.
Preparation Time: 25 minutes (plus 1 hour chilling) Cooking Time: 10 minutes Servings: 30 cookies Estimated Nutrition Info: 120 calories per cookie (based on 3-inch egg shape)
Ingredients:
| Ingredient | Amount |
|---|---|
| Unsalted butter, softened | 1 cup (226g) |
| Granulated sugar | 1 cup (200g) |
| Large egg | 1 |
| Vanilla extract | 2 tsp |
| Almond extract (optional) | ½ tsp |
| All-purpose flour | 3 cups (375g) |
| Baking powder | 1 tsp |
| Salt | ½ tsp |
For royal icing: 4 cups powdered sugar, 3 tbsp meringue powder, 9–10 tbsp water, gel food colors (pastel pink, blue, yellow, purple), sprinkles.
Instructions:
- Cream butter and sugar until light and fluffy, about 2 minutes.
- Beat in egg and extracts until combined.
- Whisk flour, baking powder, and salt; add to wet ingredients and mix just until dough forms.
- Divide dough in half, flatten into disks, wrap in plastic, and chill 1 hour.
- Preheat oven to 350°F (175°C). Roll dough to ¼-inch thick on floured surface.
- Cut with egg-shaped cookie cutter and place 1 inch apart on parchment-lined sheets.
- Bake 8–10 minutes until edges are just golden. Cool completely on wire racks.
- Mix royal icing to 20-second flood consistency. Outline and flood cookies in base colors; let set 30 minutes.
- Add dots, stripes, or zigzags with contrasting colors using a #2 tip. Add sprinkles while wet if desired.
- Let icing dry 2+ hours before stacking.
Why You’ll Love It: These cookies are weeknight-friendly once the dough chills, and the icing sets fast enough for same-day serving. Swap almond extract for lemon zest for a bright twist, or use store-bought glaze icing if you want zero mixer time. They store beautifully for up to a week.

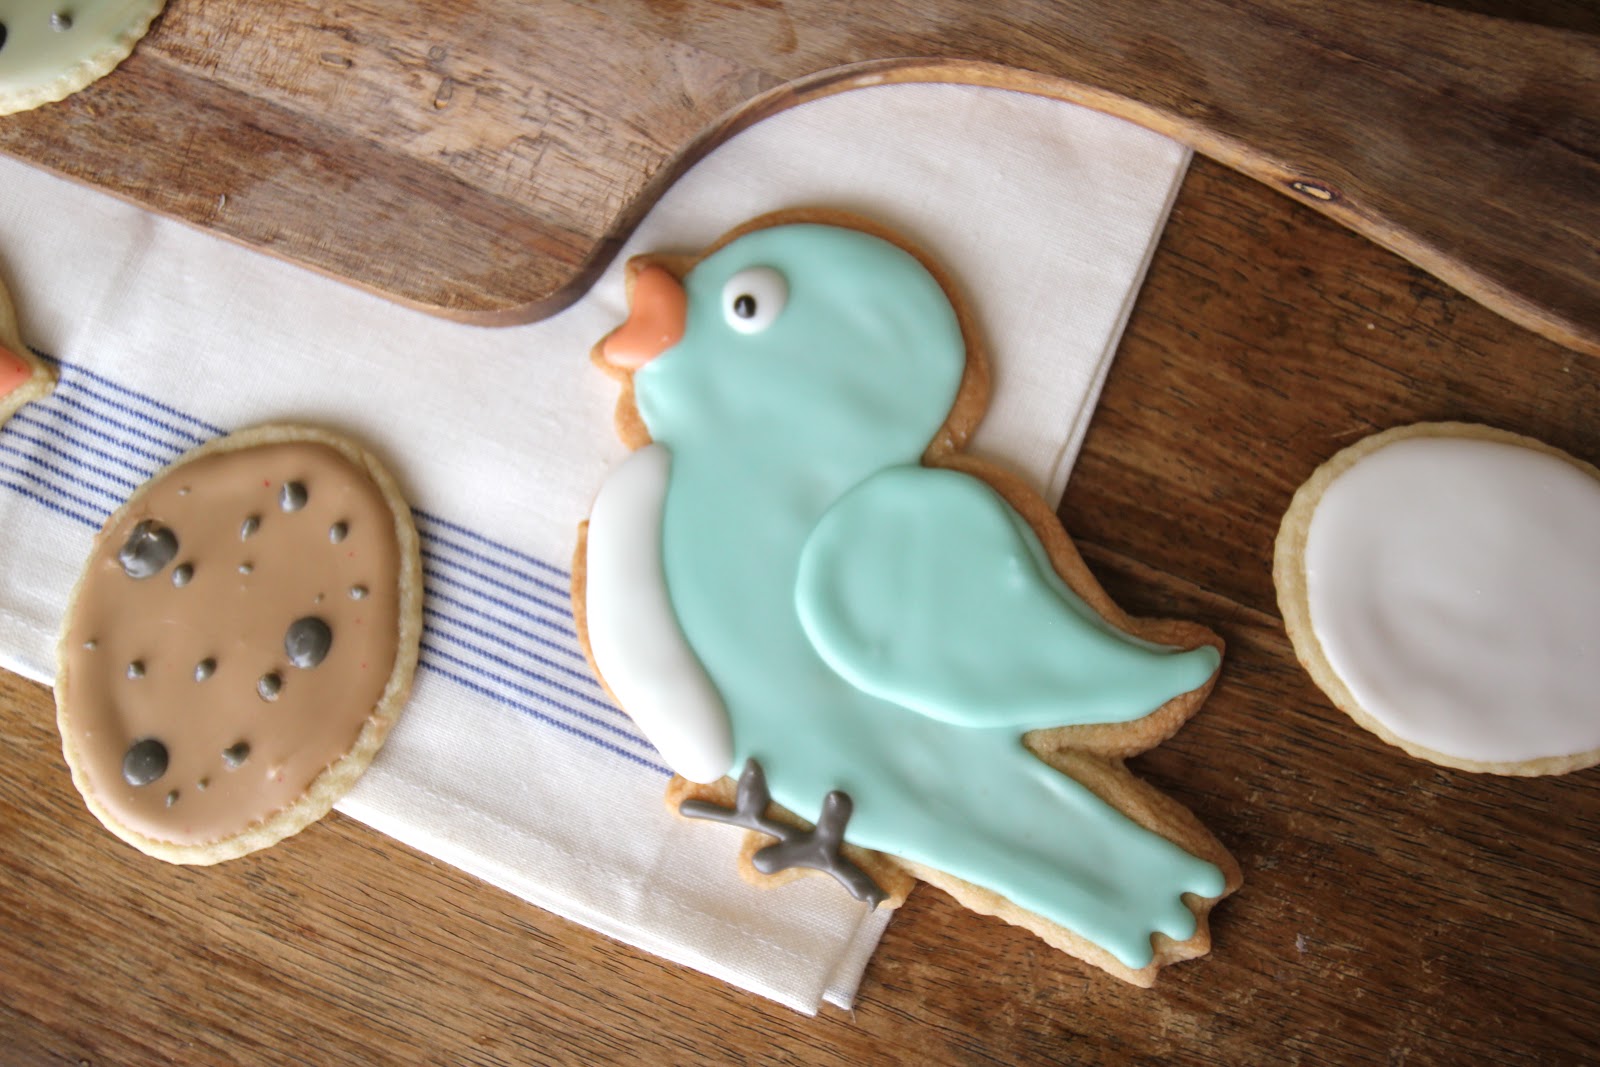
2. Speckled Robin’s Egg Easter Cookies
Imagine biting into a tender, vanilla-scented cookie topped with smooth pastel icing that looks like real bird eggs. A light dusting of cocoa creates realistic speckles, giving these a charming, bakery-case look with almost no extra effort.
Preparation Time: 20 minutes (plus chilling) Cooking Time: 9 minutes Servings: 28 cookies Estimated Nutrition Info: 115 calories per cookie
Ingredients:
| Ingredient | Amount |
|---|---|
| Unsalted butter, softened | ¾ cup (170g) |
| Granulated sugar | ¾ cup (150g) |
| Large egg | 1 |
| Vanilla extract | 1½ tsp |
| All-purpose flour | 2¾ cups (345g) |
| Baking powder | ¾ tsp |
| Salt | ¼ tsp |
For icing: 3 cups powdered sugar, 2½ tbsp meringue powder, 7–8 tbsp water, pastel gel colors, unsweetened cocoa powder for speckling.
Instructions:
- Cream butter and sugar until fluffy.
- Add egg and vanilla; mix well.
- Stir in dry ingredients until dough comes together.
- Chill wrapped disks 45–60 minutes.
- Roll to ¼ inch, cut egg shapes, and bake at 350°F for 8–10 minutes.
- Cool fully.
- Prepare flood-consistency royal icing in soft blues, greens, and yellows.
- Flood cookies and let dry 20 minutes.
- Mix a tiny bit of cocoa with water or vodka into a thin paint; flick onto cookies with a brush for speckles.
- Dry completely.
Why You’ll Love It: The speckling technique takes seconds but looks impressive—great for last-minute baskets. Use gel colors sparingly for soft pastels, or skip speckles for solid colors if you prefer even simpler decorating. Perfect for gifting or egg hunts.
3. Peeps-Inspired Bunny Sugar Cookies
Soft sugar cookies coated in sparkling sanding sugar feel crunchy on the outside and melt-in-your-mouth tender inside. Tiny icing faces and a mini marshmallow tail make them look just like your favorite marshmallow treats—but fresher and more fun.
Preparation Time: 15 minutes (plus chilling) Cooking Time: 10 minutes Servings: 24 cookies Estimated Nutrition Info: 130 calories per cookie
Ingredients:
| Ingredient | Amount |
|---|---|
| Butter, softened | 1 cup |
| Sugar | 1 cup |
| Egg | 1 |
| Vanilla | 2 tsp |
| Flour | 3 cups |
| Baking powder | 1 tsp |
| Salt | ½ tsp |
For decoration: White royal icing or glaze, pastel sanding sugar, black/brown icing for faces, mini marshmallows.
Instructions:
- Cream butter and sugar; add egg and vanilla.
- Mix in dry ingredients; chill 1 hour.
- Roll, cut bunny shapes, bake at 350°F 9–11 minutes.
- Cool.
- Outline and flood bunny body with white icing.
- Immediately dip into sanding sugar or sprinkle generously.
- Add eyes, nose, and whiskers with small piping tip.
- Press half a mini marshmallow on the back for a tail while icing is wet.
Why You’ll Love It: Kids adore these, and the sanding sugar method means almost no detailed piping. Swap mini marshmallows for white chocolate chips if you prefer no-stick tails. Ready in under an hour after baking.

4. Simple Carrot Easter Cookies
Buttery cookies with vibrant orange bodies and green leafy tops deliver fresh spring flavor and a satisfying crunch from coarse sprinkles. The bright colors pop on any dessert table.
Preparation Time: 20 minutes Cooking Time: 10 minutes Servings: 32 cookies Estimated Nutrition Info: 125 calories per cookie
Ingredients:
| Ingredient | Amount |
|---|---|
| Butter | 1 cup |
| Sugar | ¾ cup |
| Egg | 1 |
| Vanilla | 1 tsp |
| Orange zest (optional) | 1 tsp |
| Flour | 3 cups |
| Baking powder | 1 tsp |
| Salt | ½ tsp |
For decoration: Orange and green royal icing, green jimmies or sprinkles.
Instructions:
- Cream butter, sugar, and zest; add egg and vanilla.
- Add dry ingredients; chill dough.
- Cut carrot shapes; bake 350°F 8–10 minutes.
- Cool.
- Flood orange body and let set slightly.
- Pipe or flood green tops; immediately add green sprinkles for texture.
- Dry 1–2 hours.
Why You’ll Love It: These are budget-friendly and fast—sprinkles do most of the work. Add a touch of cinnamon to the dough for warmth, or use buttercream instead of royal icing for a softer bite that kids love.

5. Wet-on-Wet Easter Egg Swirl Cookies
These cookies feature glossy, marbled pastel swirls that look fancy but come together with one consistency of icing. The smooth, slightly crisp icing contrasts beautifully with the soft cookie underneath.
Preparation Time: 25 minutes (plus chill) Cooking Time: 9 minutes Servings: 26 cookies Estimated Nutrition Info: 118 calories per cookie
Ingredients: Same base sugar cookie dough as Classic Easter Egg.
For icing: Royal icing at flood consistency in 4 pastel colors.
Instructions:
- Prepare and bake egg-shaped cookies as directed.
- Prepare one batch of flood royal icing; divide and color.
- Flood base color over entire egg.
- Immediately drop dots or lines of contrasting colors.
- Drag a toothpick through the colors in swirls or zigzags.
- Tap cookie gently to settle; dry 2 hours.
Why You’ll Love It: The wet-on-wet method is beginner-proof and creates unique designs every time—no two cookies are exactly alike. Great for using up small amounts of leftover colors.

6. Chick and Bunny Buttercream Cookies
Fluffy vanilla buttercream pipes easily into cheerful chicks and bunnies. These feel extra soft and creamy compared to royal icing versions, with a bright yellow or white base that screams spring.
Preparation Time: 30 minutes Cooking Time: 10 minutes Servings: 24 cookies Estimated Nutrition Info: 160 calories per cookie (with frosting)
Ingredients: Sugar cookie base as above.
Buttercream: 1 cup butter, 4 cups powdered sugar, 3–4 tbsp milk, 2 tsp vanilla, gel colors (yellow, pink, black).
Instructions:
- Bake bunny and chick shapes.
- Beat butter until creamy; add sugar, milk, and vanilla.
- Color as needed.
- Pipe chick bodies with round tip, add wings, beaks, and eyes.
- For bunnies, pipe ears and faces; add coconut for “fur” if desired.
- Let set 30 minutes.
Why You’ll Love It: Buttercream is more forgiving and tastes richer—ideal if royal icing feels intimidating. These hold up well for 3–4 days at room temperature.

7. Sprinkle-Dipped Easter Egg Cookies
Crisp sugar cookies half-dipped in colorful glaze and rolled in sprinkles give maximum crunch and color with minimal time. They look playful and taste like a celebration in every bite.
Preparation Time: 15 minutes Cooking Time: 10 minutes Servings: 30 cookies
Ingredients: Basic sugar cookie dough.
Glaze: 2 cups powdered sugar, 3–4 tbsp milk, 1 tsp vanilla, food colors, assorted sprinkles.
Instructions:
- Bake egg cookies; cool.
- Mix glaze to thick but dip-able consistency.
- Dip half of each cookie; let excess drip.
- Roll dipped edge in sprinkles immediately.
- Place on rack to set 1 hour.
Why You’ll Love It: No piping bags needed—just dip and roll. Perfect for very young helpers and scales easily for big crowds.

8. Floral Easter Egg Cookies with Royal Icing
Delicate piped flowers and leaves on pastel eggs bring a garden-fresh feel. The cookies stay soft for days, and the detailed but simple floral accents elevate any spring platter.
Preparation Time: 30 minutes (plus chill) Cooking Time: 9 minutes Servings: 25 cookies
Ingredients: Sugar cookie base.
Royal icing in multiple colors, tips #2 and #3.
Instructions:
- Bake eggs.
- Flood base color; dry.
- Pipe small flower centers, then petals around them.
- Add leaves with green icing.
- Dry fully.
Why You’ll Love It: These look elegant but use basic piping skills. Change flower colors to match your table or use as place cards.

9. Quick Glaze Bunny and Carrot Cookies
Shiny, quick-drying glaze in bright spring hues coats these cookies in minutes. The light glaze lets the buttery cookie flavor shine through while keeping decorating time to a minimum.
Preparation Time: 20 minutes Cooking Time: 10 minutes Servings: 28 cookies
Ingredients: Sugar cookie dough.
Glaze: 2½ cups powdered sugar, ¼ cup light corn syrup, 3–4 tbsp milk, colors.
Instructions:
- Bake shapes.
- Mix glaze; divide and color.
- Outline loosely and flood or dip entire cookie.
- Add details while wet or after partial set.
- Dry 4–6 hours (faster than royal in humid weather).
Why You’ll Love It: This glaze sets quicker on humid days and tastes sweeter and less “crunchy.” Easy swap for anyone avoiding meringue powder.
Choosing the Right Icing for Fast Decorating
Royal icing gives sharp details and dries hard, perfect for intricate eggs. Glaze or buttercream works better for quick, kid-friendly projects. Test consistency on a plate first—flood should smooth in 10–15 seconds.
Tips for No-Spread Cookies Every Time
Chill dough thoroughly and avoid over-flouring your surface. Bake on the middle rack and watch closely—pull them when edges turn pale gold for soft centers.
Storage and Make-Ahead Advice
Decorated cookies keep in an airtight container up to 7 days at room temperature. Freeze undecorated baked cookies 2 months; thaw and decorate fresh. Iced cookies freeze well too if layered with parchment.
Common Decorating Mistakes to Avoid
Don’t flood too soon after outlining—the lines will bleed. Work in small batches so icing doesn’t crust in the bowl. Have paper towels and toothpicks handy for quick fixes.
FAQ
Can I make these cookies gluten-free? Yes—swap the all-purpose flour for a 1:1 gluten-free baking blend. Add ¼ tsp xanthan gum if your blend doesn’t include it. The texture stays close to classic.
How far ahead can I bake the cookies? Bake up to 3 days before decorating and store in a single layer in an airtight tin. Freeze for longer storage.
What if I don’t have meringue powder? Use the easy glaze recipe with corn syrup or a simple powdered sugar + milk + vanilla mixture. It won’t dry as hard but works great for fast decorating.
How do I store decorated cookies so they don’t stick? Let icing dry completely (at least 4–8 hours), then layer between parchment paper in a container. Keep away from humidity.
Can kids help with these? Absolutely. Younger ones love dipping in sprinkles or adding tails and eyes. Older kids can try wet-on-wet swirls or simple piping.
What’s the best way to color royal icing? Always use gel food coloring—liquid can thin the icing too much. Add a tiny bit at a time until you reach the shade you want.
Do these recipes double well? Yes! Double the dough and icing without issue. Just chill in smaller batches so everything stays cold while you work.
My icing is too thick/thin—what now? For royal icing that’s too thick, add water ½ teaspoon at a time. Too thin? Add sifted powdered sugar. Mix well and test again.
These fast Easter sugar cookies prove you don’t need fancy tools or all day in the kitchen to create something special. Pick one or two designs that match your time and supplies, then enjoy the smiles when everyone sees (and tastes) them. Save this list for next year—you’ll be glad you did. Happy Easter baking!